A good shot for commercial shooting: Start from light distribution!
2018.06.12
“In an era when everyone is inseparable from the Internet, e-commerce can be said to be more and more developed, and the accompanying demand for commercial shooting pictures has also grown. Friends, who love photography, have you ever had experience of commercial shooting? How to produce a beautiful photo for jewels, 3C products, and other small objects? Take a look at the content of this article. There are many practical experiences to share! ”
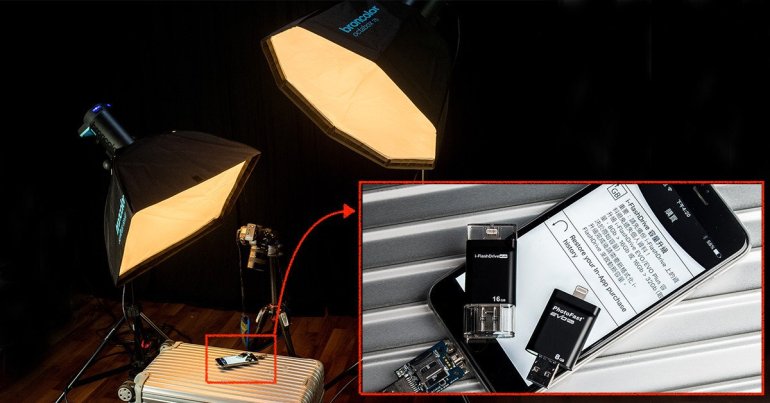
This time we are going to shoot the PhotoFast iPhone i-FlashDrive Evo, the highlights include the branding of the flash drive on the phone, the flash drive with the cover removed in the lower left corner, and the text displayed on the mobile phone screen. Since the screen of the mobile phone is relatively complicated to retouch, this article will first explain the shooting preparation and lighting distributions. The next article will explain how to retouch the picture.
-
The light will be only distributed on “object”, while the screen of the phone need “longer expose”
 LCD screen has become the most common topic to talk about! This is due to there are a lot of different skill to photograph the LCD screen in the same environment. From the basic spot metering, polarizer filter reflection, to not able to get it, therefore eating it and many others. However, now there are many opportunities to shoot LCD screens, whether a cell phone, a computer, or television, you will just need to pay more attention to it!
The spot metering of shooting an LCD screen is the point where is the whitest, and brightness is only can be solved by using the exposure because you cant use any flashlight to lighten up the screen! Therefore in this case of shooting LCD screen in the studio, be sure to adjust the camera to the spot metering mode. After adjusting the preset aperture and ISO, determine the exposure seconds for the brightest position on the screen of your mobile phone, then you can only get a clear LCD screen image.
Besides that, if you find that the screen brightness after the correct exposure is very different from the ambient light, please adjust the LCD screen brightness directly to deal with this problem.
LCD screen has become the most common topic to talk about! This is due to there are a lot of different skill to photograph the LCD screen in the same environment. From the basic spot metering, polarizer filter reflection, to not able to get it, therefore eating it and many others. However, now there are many opportunities to shoot LCD screens, whether a cell phone, a computer, or television, you will just need to pay more attention to it!
The spot metering of shooting an LCD screen is the point where is the whitest, and brightness is only can be solved by using the exposure because you cant use any flashlight to lighten up the screen! Therefore in this case of shooting LCD screen in the studio, be sure to adjust the camera to the spot metering mode. After adjusting the preset aperture and ISO, determine the exposure seconds for the brightest position on the screen of your mobile phone, then you can only get a clear LCD screen image.
Besides that, if you find that the screen brightness after the correct exposure is very different from the ambient light, please adjust the LCD screen brightness directly to deal with this problem.
-
Macro photography needed to smaller the size of the aperture (f16 for this photo)
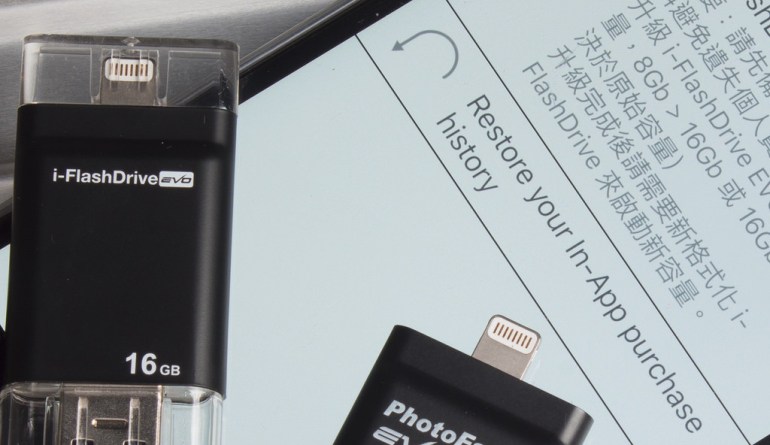 Under macro photography, the depth of field might become very shallow. In the above figure, when you want to display both the screen display and the words on your iPhone flash drive at the same time, you may need f14 or above with 70mm macro to shoot. The depth of field in the image above must also extend to the lower circuit board (lower left corner) than the iPhone screen, so the aperture above is set to f16 for the sharpest photo.
In addition, if your flashlight or studio light as lower power, under small aperture might not be able to brighten up your photo although using the full power. At this time, if you do not wish the environment light affects your picture under longer exposure time, you will only able to use the ISO to emphasize the lights. As for how to solve this problem?
There are no other methods, only with purchasing a higher power light.
Under macro photography, the depth of field might become very shallow. In the above figure, when you want to display both the screen display and the words on your iPhone flash drive at the same time, you may need f14 or above with 70mm macro to shoot. The depth of field in the image above must also extend to the lower circuit board (lower left corner) than the iPhone screen, so the aperture above is set to f16 for the sharpest photo.
In addition, if your flashlight or studio light as lower power, under small aperture might not be able to brighten up your photo although using the full power. At this time, if you do not wish the environment light affects your picture under longer exposure time, you will only able to use the ISO to emphasize the lights. As for how to solve this problem?
There are no other methods, only with purchasing a higher power light.
-
Turning on the analog lights to get the best lighting angle
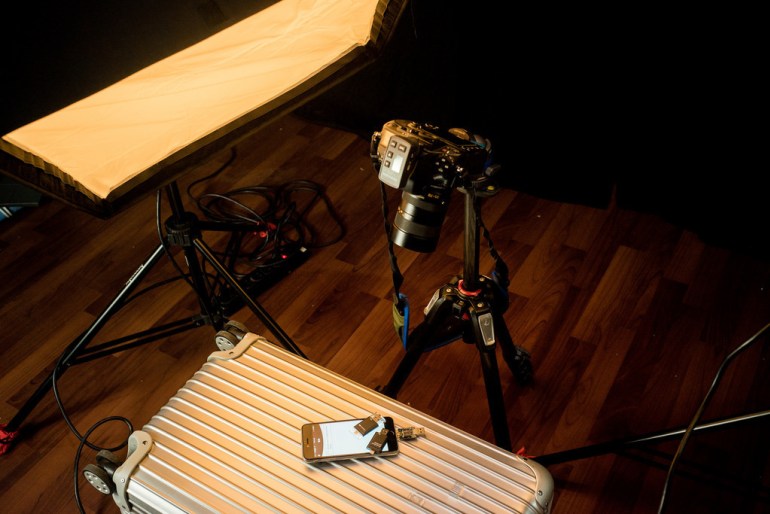 Nowadays studio light has build in analog light, which is able for you to preview the angle of light diffusion, output, etc. before taking pictures. If there is more than one lamp, it can also be used to quickly preview the ratio of light between the lamps. With the light angle. Therefore, when taking a
photo, if you are using a canopy light with an analog lamp, be sure to turn on this handy feature to reduce the amount of time it takes for light distributions.
Keep in mind that it's not embarrassing to turn on the analog light. Although I don't know why anyone thinks this way, in fact, professional photographers will also use it!
Basically, the ordinary canopy light has only the brightest, medium light, and lowest light of modes for adjustments. Therefore, the analog light can only be used to preview the lighting angle or simply light up the object for “focus easily”. However, if you are using a high-end lamp like Broncolor Siros, the analog lamp will adjust precisely as your adjustment value of the lamp output, allowing you to more accurately preview the appearance after shooting, including the brightness ratio between the lamps.
Therefore, every penny worth, a high-end mall is not only accurate in color temperature, fast in return, stable operation, even the operation is much more convenient. It is still worth to invest for common use.
Nowadays studio light has build in analog light, which is able for you to preview the angle of light diffusion, output, etc. before taking pictures. If there is more than one lamp, it can also be used to quickly preview the ratio of light between the lamps. With the light angle. Therefore, when taking a
photo, if you are using a canopy light with an analog lamp, be sure to turn on this handy feature to reduce the amount of time it takes for light distributions.
Keep in mind that it's not embarrassing to turn on the analog light. Although I don't know why anyone thinks this way, in fact, professional photographers will also use it!
Basically, the ordinary canopy light has only the brightest, medium light, and lowest light of modes for adjustments. Therefore, the analog light can only be used to preview the lighting angle or simply light up the object for “focus easily”. However, if you are using a high-end lamp like Broncolor Siros, the analog lamp will adjust precisely as your adjustment value of the lamp output, allowing you to more accurately preview the appearance after shooting, including the brightness ratio between the lamps.
Therefore, every penny worth, a high-end mall is not only accurate in color temperature, fast in return, stable operation, even the operation is much more convenient. It is still worth to invest for common use.
- Left light in lower angle to create atmosphere, while right light with a higher angle to light up a small area of the object
相關文章
-
Dedicated to new photography fans, six thoughts on purchasing Speedlights
-
Dedicated to new photography fans, three key methods for the operation of Speedlights
-
Understanding these will allow you to easily play with filters
-
Methods on shooting in the interior of a car
-
Methods on shooting interior lighting
-
The lighting for food is important? Let Tastemade tell you!