Methods on shooting interior lighting
2018.07.26
“In the bustling commercial state we live in today, neatly polished commercial photos can be seen everywhere from subway stations, bus stations, to the side of buildings, buses, subway trains, and even on our phones and computers. Friends, who are interested in photography, have you ever thought of how these shots were created? This article will discuss and share with you three basics points when shooting commercial photos, focusing on aspects of its lighting, metering method and model positioning.”
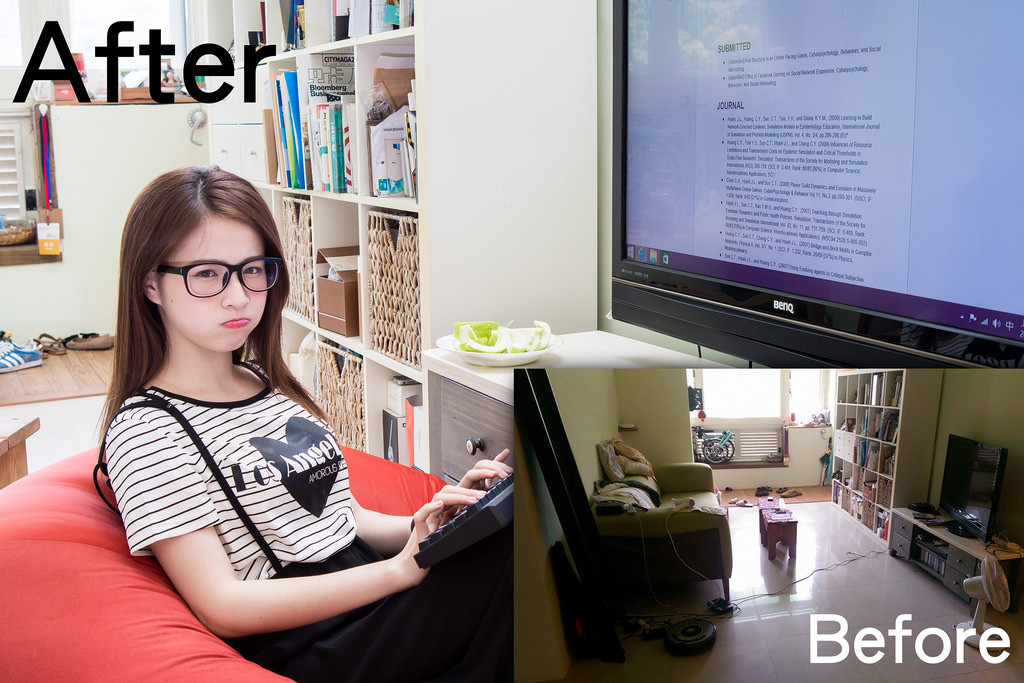
Now, what is today’s theme? Shouldn’t you be able to tell already by looking at the cover photo of this article? The answer is “lighting” and “television”. When I shot this set of photos, I have not yet purchased a softbox light, so all the problems with lighting are solved by using small speedlights, utilising off-camera + bounce flash. Now how is that achieved? Please read on.
1. Where should the model sit?
Not sure if everyone has noticed something: most “TV” commercials either have people sitting really close to the television or is shot from an angle that makes the person look really close to the television. The reason for this is simple, because if you don’t have the person in the shot positioned close to the television, then unless you have a full panel advertisement, either the television will appear too small, or the person will become miniature. Both results in a hollow shot with no apparent theme. Now recall the quote that I’ve mentioned, “stuff that seems natural are usually shot through unnatural ways”, now look at the picture below, do you think it’s weird how close to the television the model sits?
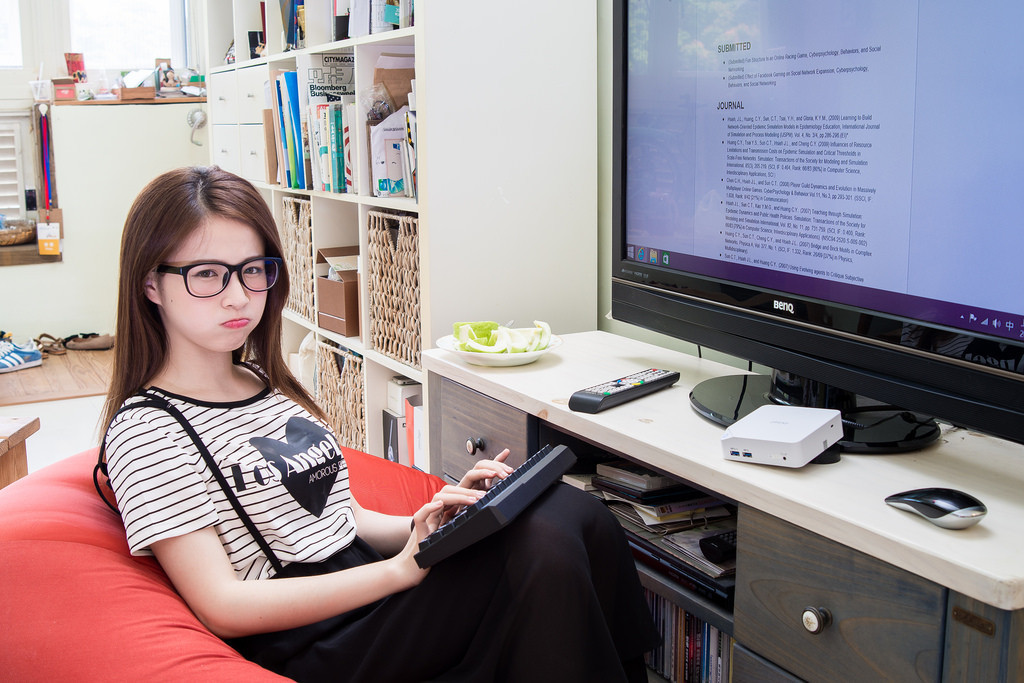 Image above: Sitting so close to the television will ruin the model’s eyes!
Aside from preventing the person or the TV from appearing too small, resulting in an image with no theme, another reason is that “most people’s houses do not look like a sample house meant for photoshoots”. Therefore if you try to place the person further away from the television, the result may look like the picture below—a bunch of random stuff surrounding the subjects. Thus, positioning the model and the TV closer to each other, or even shooting from impossible positions are both good ways to solve the problem described above.
Image above: Sitting so close to the television will ruin the model’s eyes!
Aside from preventing the person or the TV from appearing too small, resulting in an image with no theme, another reason is that “most people’s houses do not look like a sample house meant for photoshoots”. Therefore if you try to place the person further away from the television, the result may look like the picture below—a bunch of random stuff surrounding the subjects. Thus, positioning the model and the TV closer to each other, or even shooting from impossible positions are both good ways to solve the problem described above.
2. How should metering be done?
People who use speedlights often have a question: which subject should be the metering area? Actually, speedlights these days are very smart, and can automatically fill in the correct lighting under the TTL mode for your subjects after metering. But remember, what we’re shooting today is a television “with display”, and TVs are often the most difficult thing to prepare during a photo shoot, because if your shutter is too fast, the TV screen will be dark; if your shutter is too slow, everything other than the TV will be overexposed. Then what exactly should we do? Well, if a television is included in the theme of your photo shoot, then you’ll definitely want to prioritize the TV display when metering. As for whether or not it will be overexposed… worry not. Basically, unless your interior is as bright as it is outside under the sun, otherwise when the TV is clear, overexposure generally isn’t a problem! It would usually only occur if your speedlight setting is wrong. First, try capturing something similar to the exposure as the above image(without using speedlights), as in the TV screen is clear and of adequate brightness, the rest of the lighting for the environment or the model can be solved later with speedlights.
Note: For metering LSD screens, or positioning objects please refer to: 【Methods on shooting in the interior of a car 】
—
Well, if a television is included in the theme of your photo shoot, then you’ll definitely want to prioritize the TV display when metering. As for whether or not it will be overexposed… worry not. Basically, unless your interior is as bright as it is outside under the sun, otherwise when the TV is clear, overexposure generally isn’t a problem! It would usually only occur if your speedlight setting is wrong. First, try capturing something similar to the exposure as the above image(without using speedlights), as in the TV screen is clear and of adequate brightness, the rest of the lighting for the environment or the model can be solved later with speedlights.
Note: For metering LSD screens, or positioning objects please refer to: 【Methods on shooting in the interior of a car 】
—
3. How should the speedlights be positioned?
You can see from the image above and the “Before” on the bottom right corner of the cover photo, although this interior has lighting coming from the outside through the windows, it is still rather difficult to illuminate the whole living room. That, plus the insufficient lighting equipment, even if all the lights are turned on the scene still looks a bit… dark. Therefore it is important to see if the areas other than the main subjects (person + TV) are illuminated evenly, to avoid shots where the subjects are bright but the background is dark. => For adjusting the brightness of speedlights please see:【Dedicated to new photography fans, three key methods on the operation of Speedlights 】 From the article in the link above you will learn that “in order to ensure that the background is bright enough, you will need to extend the time of the shutter”. But here comes a problem: the shutter speed has to cater to the display of the TV screen, and cannot be promptly changed (see image above, if the background is bright enough, the television will be overexposed). Then how should we make the background as bright as the subjects?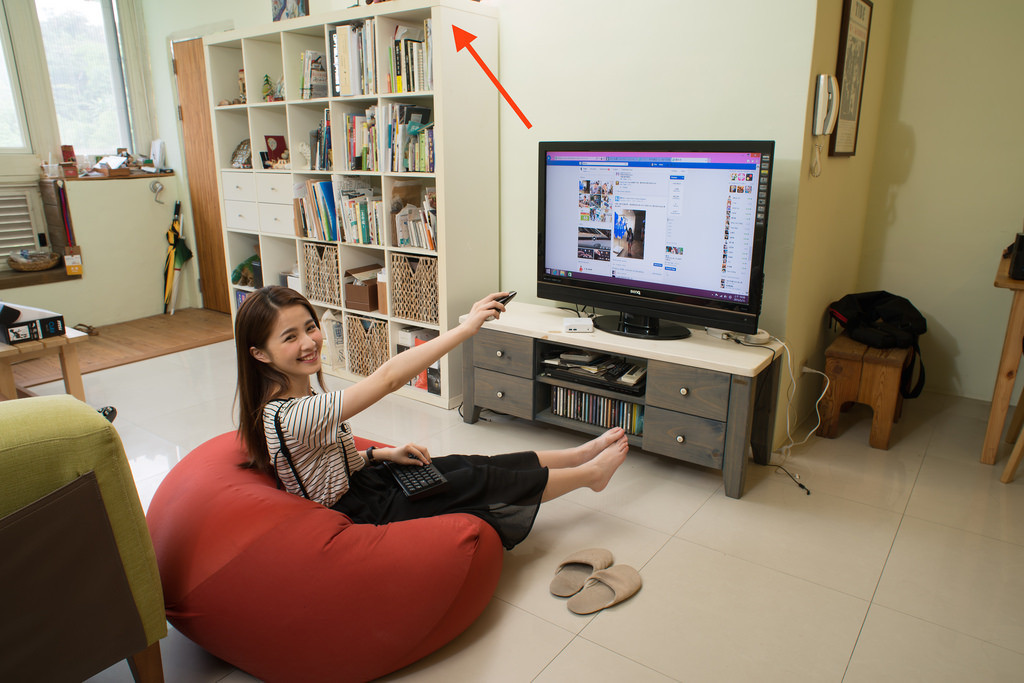 The answer is actually very simple, all you need to do is place a speedlight high above in the background and utilize bounce flash! I have placed one right around where the arrow is pointing at, then all I need to do is to point the light towards the ceiling so that the light can be spread evenly below, illuminating the background. However, it is not exactly necessary to place the speedlight behind the subjects, anywhere high up within its vicinity will do. Now, why should it be placed up high then?
This is so the speedlight itself doesn’t get captured in the scene or “illuminate the subjects”. Other lights are used to light the subjects, this one on the top need only to brighten the background.
The answer is actually very simple, all you need to do is place a speedlight high above in the background and utilize bounce flash! I have placed one right around where the arrow is pointing at, then all I need to do is to point the light towards the ceiling so that the light can be spread evenly below, illuminating the background. However, it is not exactly necessary to place the speedlight behind the subjects, anywhere high up within its vicinity will do. Now, why should it be placed up high then?
This is so the speedlight itself doesn’t get captured in the scene or “illuminate the subjects”. Other lights are used to light the subjects, this one on the top need only to brighten the background.
 With the off-camera flash high above, the background can be lit easily. Do you feel a realization as if “ah! How fool I was before, there’s no way the environment is so bright”? This is how amazing a thing speedlights are, worth spending a lifetime to explore.
—
With the off-camera flash high above, the background can be lit easily. Do you feel a realization as if “ah! How fool I was before, there’s no way the environment is so bright”? This is how amazing a thing speedlights are, worth spending a lifetime to explore.
—
4. How about the subject lighting?
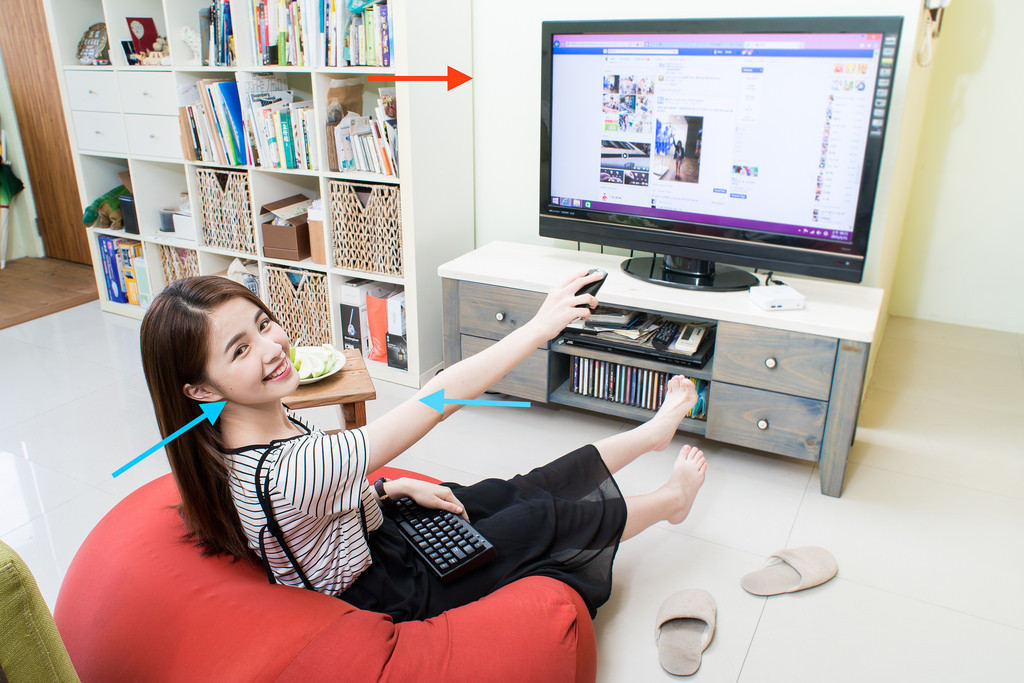 There are countless ways to light a subject, the method I employed here is the most basic “bounce flash”. The reason is that I want to cultivate a homely, cozy feeling, so my lighting objective is simply to “light up the subjects”. Therefore I used the most basic bounce flash and asked my assistant to hold the speedlights while standing right behind me (since I’m standing very close to KeKe and using a wide angle lens, the lighting will be too hard if I place the speedlight on top of the camera). By utilizing off-camera flash to control two lights that illuminate the background and the subjects, I get the result seen above. The blue arrows are what is lit by the speedlight held by my assistant, while the red arrow is lighted together by the speedlight behind me and the one placed high above (so there are no shadows).
Now is it clear to everyone how this set of photos were handled? Although they look like simple everyday home life photos, when considering the balance of the TV screen brightness, background brightness, and model brightness, some more care needs to be put into lighting in order for it to work!
If you are interested in our articles, you can also LIKE our page:)
There are countless ways to light a subject, the method I employed here is the most basic “bounce flash”. The reason is that I want to cultivate a homely, cozy feeling, so my lighting objective is simply to “light up the subjects”. Therefore I used the most basic bounce flash and asked my assistant to hold the speedlights while standing right behind me (since I’m standing very close to KeKe and using a wide angle lens, the lighting will be too hard if I place the speedlight on top of the camera). By utilizing off-camera flash to control two lights that illuminate the background and the subjects, I get the result seen above. The blue arrows are what is lit by the speedlight held by my assistant, while the red arrow is lighted together by the speedlight behind me and the one placed high above (so there are no shadows).
Now is it clear to everyone how this set of photos were handled? Although they look like simple everyday home life photos, when considering the balance of the TV screen brightness, background brightness, and model brightness, some more care needs to be put into lighting in order for it to work!
If you are interested in our articles, you can also LIKE our page:)
相關文章
-
Dedicated to new photography fans, six thoughts on purchasing Speedlights
-
A good shot for commercial shooting: Start from light distribution!
-
Dedicated to new photography fans, three key methods for the operation of Speedlights
-
Understanding these will allow you to easily play with filters
-
Methods on shooting in the interior of a car
-
The lighting for food is important? Let Tastemade tell you!