Methods on shooting in the interior of a car
2018.07.26
“How should we approach shooting lively and polished commercial photos in the cramped and often dimly-lit interior of a car? This lesson will walk you through in detail starting from the choice of lenses, the control of lighting, the position of the cameraman to the posing of the model. Even if you don’t shoot commercial photos, you could still employ the same techniques in the future to get nice and pretty shots for your family and friends in the interior of a car.”
People that are familiar with the Ford Focus should know that the interior of this car is “not all that spacious”. However, it does not appear to be cramped at all in these photos(even if the set is in fact, extremely crowded in reality), so how exactly is this achieved?
1. Employ using wide angle lenses less than 35mm
 The interior of a car is packed, so unless you are shooting in a bus, generally speaking, anything over 35mm would be too large. Take for instance when taking the picture above, I used a 35mm lens while squatting outside the car (indeed, not only is Liz half-hanging outside the car, I’m outside too), getting a shot that looked approximately like this. As you can observe in the picture, even if the camera is placed roughly above the passenger seat, the scene will still look rather confined (if your focus is on the interior modeling of the car). Therefore unless your main shooting objective is the person and the things they are holding, anything exceeding 35mm would generally be not ok.
Note: Please note, all the focal lengths mentioned in my photography lessons is based on the full-frame format, if you use another format, please do the conversions yourself. Refer to this article if you don’t know how to do that.
The interior of a car is packed, so unless you are shooting in a bus, generally speaking, anything over 35mm would be too large. Take for instance when taking the picture above, I used a 35mm lens while squatting outside the car (indeed, not only is Liz half-hanging outside the car, I’m outside too), getting a shot that looked approximately like this. As you can observe in the picture, even if the camera is placed roughly above the passenger seat, the scene will still look rather confined (if your focus is on the interior modeling of the car). Therefore unless your main shooting objective is the person and the things they are holding, anything exceeding 35mm would generally be not ok.
Note: Please note, all the focal lengths mentioned in my photography lessons is based on the full-frame format, if you use another format, please do the conversions yourself. Refer to this article if you don’t know how to do that.
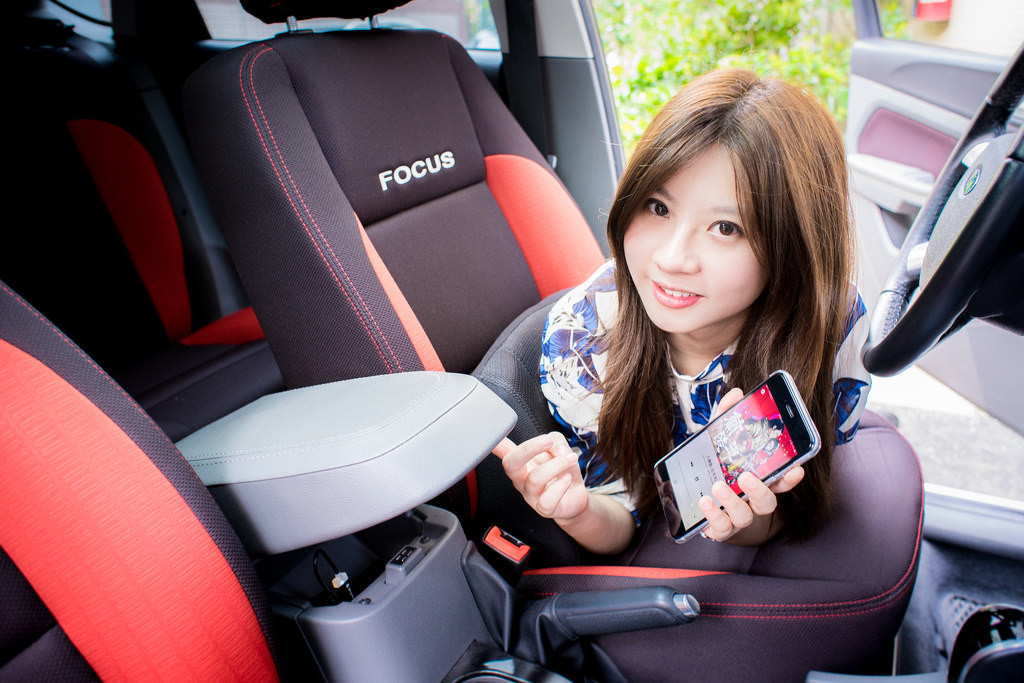
2. Don’t restrict yourself to only shooting from the passenger seat, shooting the front row from the back seat, or the other way around is also a nice option
 A lot of people feel determined to frame the person sitting on the driver’s seat from the passenger seat, but that is not actually necessary! Try shooting from the front, shooting from the back, or shooting from outside the car, all of these are good and viable methods. The image above is shot from the back row behind the passenger seat with a 24mm lens, then asking Liz to hold the iPhone properly, position her right hand accordingly then turning back to look into the camera. This can prevent the image from looking too vacant, or have the same angle throughout. Additionally, there is another advantage of using a wide angle lens inside a car: by holding the camera up high and shooting downwards, your model’s face will appear smaller. If the focal length of your lens is too long, you won’t be able to do this.
Note: you won’t be able to access the viewfinder with the camera raised up high, so do utilize the LiveView function of your DSLR or just directly shoot with a MILC
A lot of people feel determined to frame the person sitting on the driver’s seat from the passenger seat, but that is not actually necessary! Try shooting from the front, shooting from the back, or shooting from outside the car, all of these are good and viable methods. The image above is shot from the back row behind the passenger seat with a 24mm lens, then asking Liz to hold the iPhone properly, position her right hand accordingly then turning back to look into the camera. This can prevent the image from looking too vacant, or have the same angle throughout. Additionally, there is another advantage of using a wide angle lens inside a car: by holding the camera up high and shooting downwards, your model’s face will appear smaller. If the focal length of your lens is too long, you won’t be able to do this.
Note: you won’t be able to access the viewfinder with the camera raised up high, so do utilize the LiveView function of your DSLR or just directly shoot with a MILC
3. Natural looking poses are often shot by posing unnaturally
 “Stuff that seems natural is usually shot through unnatural ways.” — Chen Ning
Hear this quote now, you will see it a lot more often in the future, so do remember it. I recall seeing a behind the scenes reel of McDonald’s Big Mac a while back, it pointed out that the reason the Big Macs in the photos look very lavish (and tall) is because all the ingredients were pushed to the front when the photos were shot. This led me to a profound realization: the only thing rendered in a photo is what you see from the camera’s view, why should you care about anything else? In other words, you need only put care into what you will see in the final product, it doesn’t matter how weird and ridiculous the rest of the set looks! The photoshoot is to be prioritized above all.
Take for instance the picture above, you see a young woman lying on the driver’s seat, all is natural and nothing looks out of place, but is that really so? Think about it again, are you able to lean the upper half of your body onto a car seat, and hide the rest of your body inside the car as well?
Of course not! Do you think everyone a yoga master?
“Stuff that seems natural is usually shot through unnatural ways.” — Chen Ning
Hear this quote now, you will see it a lot more often in the future, so do remember it. I recall seeing a behind the scenes reel of McDonald’s Big Mac a while back, it pointed out that the reason the Big Macs in the photos look very lavish (and tall) is because all the ingredients were pushed to the front when the photos were shot. This led me to a profound realization: the only thing rendered in a photo is what you see from the camera’s view, why should you care about anything else? In other words, you need only put care into what you will see in the final product, it doesn’t matter how weird and ridiculous the rest of the set looks! The photoshoot is to be prioritized above all.
Take for instance the picture above, you see a young woman lying on the driver’s seat, all is natural and nothing looks out of place, but is that really so? Think about it again, are you able to lean the upper half of your body onto a car seat, and hide the rest of your body inside the car as well?
Of course not! Do you think everyone a yoga master?
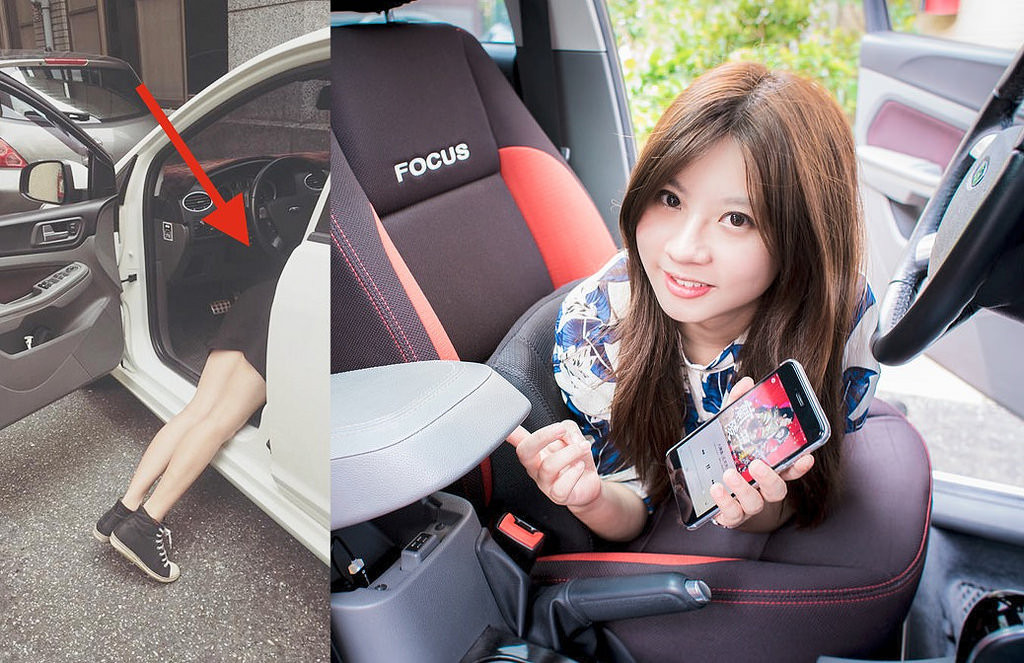
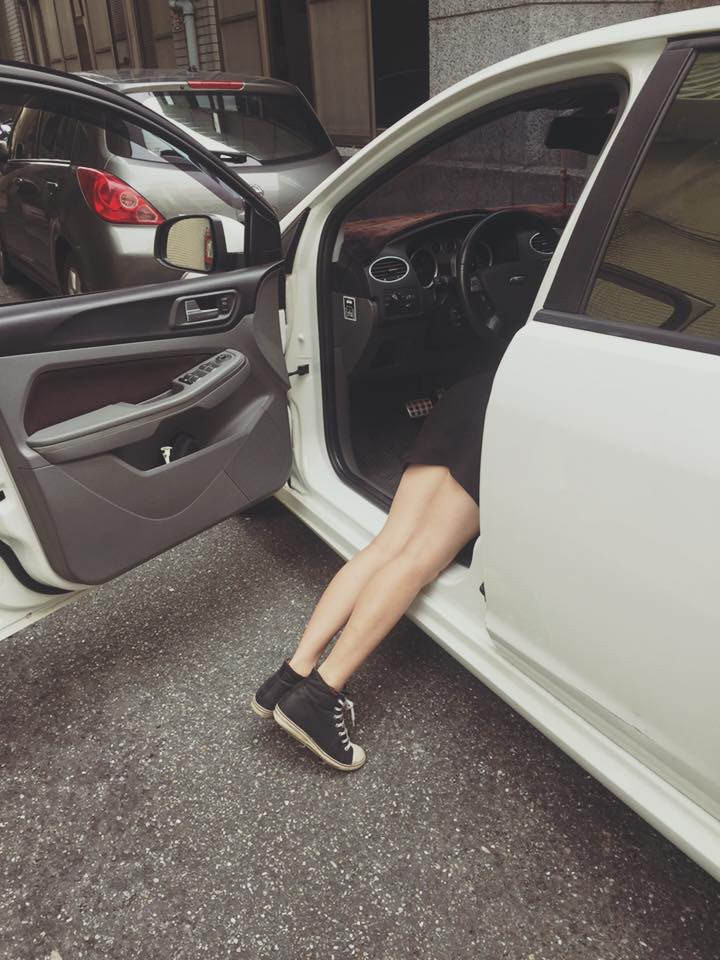 Reality tends to be cruel, the previous picture with the lively looking lady actually looks like this picture above from the other side...
But so what? If I didn’t point it out with this picture above, I’m sure most people would only notice lady Liz’s face and the fact that she is leaning on the seat, no one would go out of their way to think “then where are her legs?” Though don’t assume that it’s enough to just prepare your model, while Liz is half hanging outside the car, I was in a similar position taking the photo on the other end. I can only say that photography itself is a profession that challenges the limits of both models and photographers alike.
Even though I would bring it up often in the future, I still implore you to internalize this concept: “Stuff that seems natural is usually shot through unnatural ways.”
Reality tends to be cruel, the previous picture with the lively looking lady actually looks like this picture above from the other side...
But so what? If I didn’t point it out with this picture above, I’m sure most people would only notice lady Liz’s face and the fact that she is leaning on the seat, no one would go out of their way to think “then where are her legs?” Though don’t assume that it’s enough to just prepare your model, while Liz is half hanging outside the car, I was in a similar position taking the photo on the other end. I can only say that photography itself is a profession that challenges the limits of both models and photographers alike.
Even though I would bring it up often in the future, I still implore you to internalize this concept: “Stuff that seems natural is usually shot through unnatural ways.”
4. Adjust the brightness of things that don’t work well with others
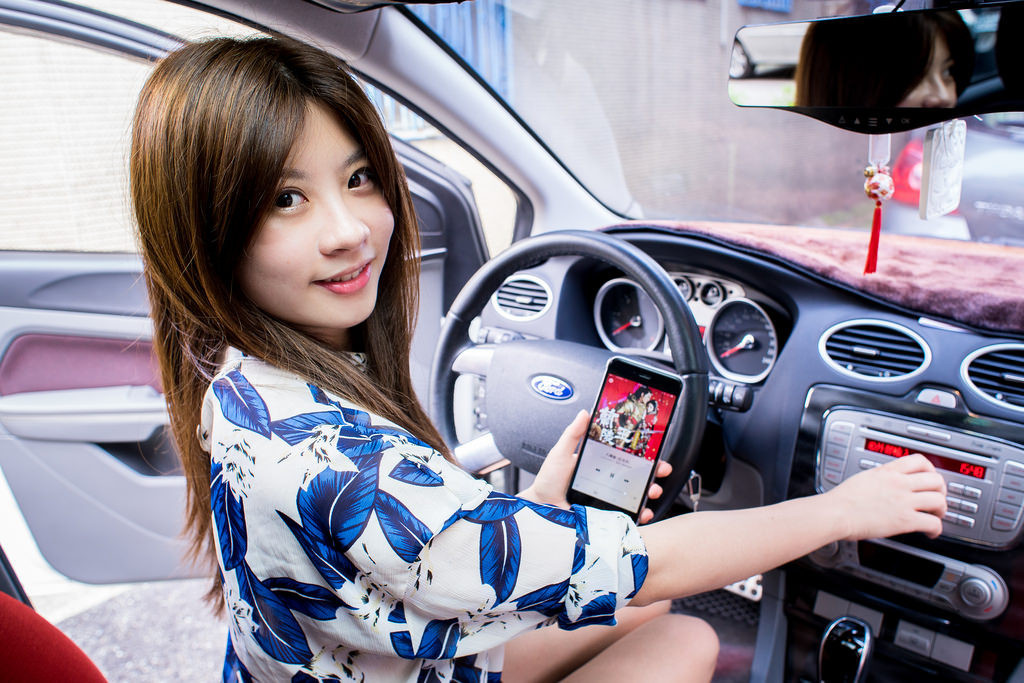
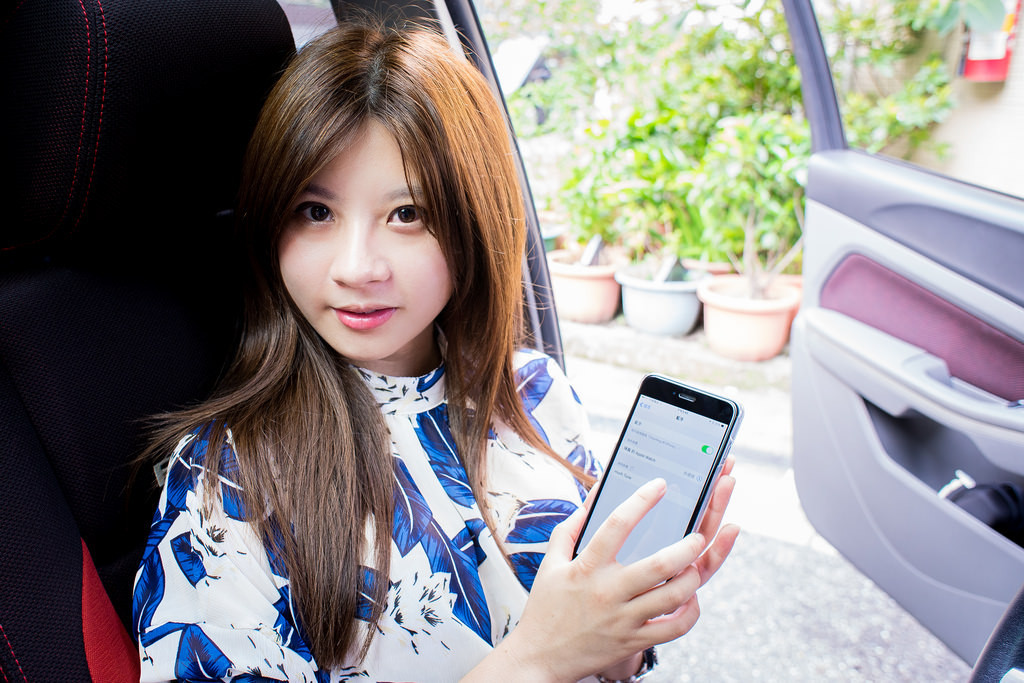 Generally speaking, the person and objects in a scene are all treated with the same source of light, so there usually won’t be things that are just drastically different than anything else in terms of brightness. Two things, however, prove to be exceptions: the first are lights, the second LCD screens. For example the picture above, iPhone displays will automatically adjust its screen brightness to the highest setting when under high brightness(or low brightness) situations, this leads to the tendency of screens being overexposed when in a shot together with a person, causing the problem of not being able to see what is on the screen (sometimes it is the opposite where although the face is clear, the screen is too dark and still can’t be seen). Instances like this can be seen in many unboxing posts or press conference photos. Pay some attention in the future to the phones in models’ hands, it’s either you can’t read the screen because it is too bright, or you can’t see the display because the screen is too dark, and this is the reason.
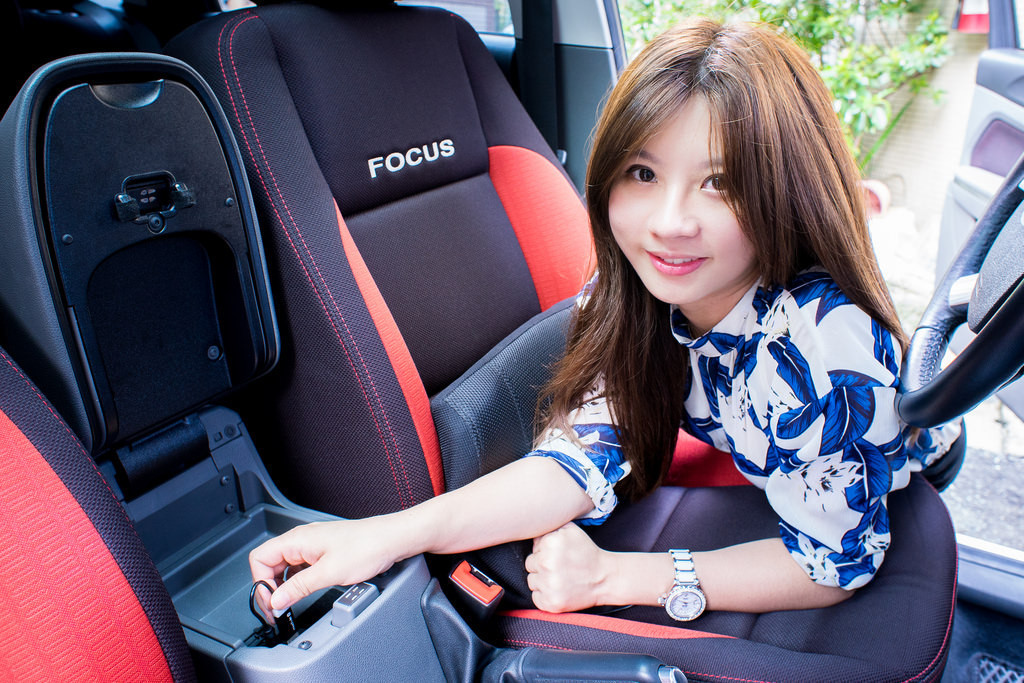
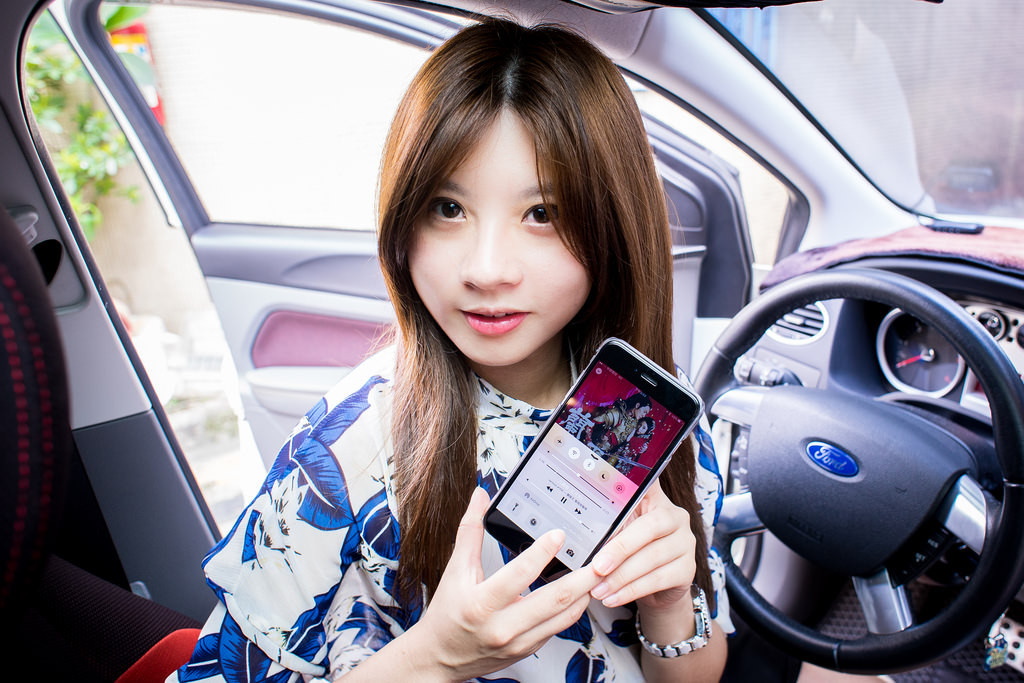 Then how should we solve this problem? Simple, simply adjust the brightness of the phone!
If the screen is too dark, turn the brightness up, or the other way around. Again, take the picture above, the phone automatically adjusted its brightness setting to the highest because the sun is bright outside when shooting inside the car. This meant that if the person’s face is well lit, the phone will be overexposed, the fastest way to combat this problem is to turn the brightness of the phone down, and in this picture the brightness of the phone was adjusted to around half, ensuring the display to look as clear as Liz’s face. This is an extremely important skill, relevant to shooting good sponsored posts, press conference posts, and unboxing photos.
If you are interested in our articles, you can also LIKE our page:)
Then how should we solve this problem? Simple, simply adjust the brightness of the phone!
If the screen is too dark, turn the brightness up, or the other way around. Again, take the picture above, the phone automatically adjusted its brightness setting to the highest because the sun is bright outside when shooting inside the car. This meant that if the person’s face is well lit, the phone will be overexposed, the fastest way to combat this problem is to turn the brightness of the phone down, and in this picture the brightness of the phone was adjusted to around half, ensuring the display to look as clear as Liz’s face. This is an extremely important skill, relevant to shooting good sponsored posts, press conference posts, and unboxing photos.
If you are interested in our articles, you can also LIKE our page:)
相關文章
-
A good shot for commercial shooting: Start from light distribution!
-
Get acquainted with the perspective compression of long-focus lens
-
Understanding these will allow you to easily play with filters
-
Methods on shooting interior lighting
-
Know before buying a camera: teaching you to know what is the sensor size, focal length, aperture?
-
The 5 main thoughts on shooting proper wedding photos!